|
...Continued from Page 10.
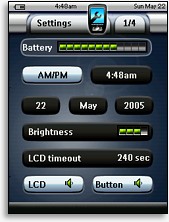
“Animation” can be set to one of four options: “Full”, “Page Only”, “Mode Only” and “None”. The “Page” option simply displays a swift vertical scrolling effect whenever a page is changed, or a horizontal effect if accessing a new device with the two quick change buttons. The “Mode” function does similarly whenever a major section is changed. Although fascinating for the first 30 seconds, these effects add needless delay and for some can quickly grow tiresome. You can set Animation to “None” if (or when) the novelty wears off!
The next option, “Cursor Navigation”, is a mode that is toggled on and off via the [Toggle] hard button (top left key surrounding the menu pad). When off, the two device left/right arrows are shown at the top of the screen and the four-way directional pad operates normal in-device functions. When enabled, a small four-way arrow icon appears on-screen. Now, pressing left or right on the directional pad will change devices, while up or down scrolls pages. This is an interesting idea that works well with the default configuration, but is generally negated by the further inclusion of dedicated [Page Up/Down] hard buttons.
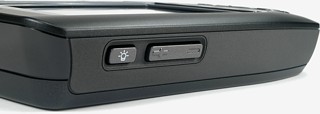
How to light it up...
Last but not least are the various screen activation modes, which can be a little confusing to describe. When the TSU3000 first came out, hitting any hard key would initially activate the LCD screen. And, if the screen had previously timed out, certain but not all hard keys would have to be hit twice before they transmitted their command. Philips has attempted to correct what many owners felt to be undesirable behavior by making this fully customizable on the TSU7000 and later TSU3000 firmware revisions. Although the [Volume] and [Channel] keys will always work on the first push and will never activate the screen, the “Firm Keys” (the four keys below the screen) and the “Cursor Keys” (the 8 buttons at the bottom of the remote) can have their behavior modified.
 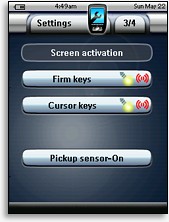
Settings Menu & Screen Activation |
Figuring out how these settings work can be perplexing as they’re only indicated by two small symbols that aren’t explained on the remote or in the manual. If the red “transmitting” icon is showing, it means that group of buttons will always work on the first push. If the yellow “flashlight” symbol is active, that group will always wake up the screen. Three combinations are available: “take one push and wake up the screen”, “take two pushes and wake up the screen” and “take one push and don’t wake up the screen”. Note that even if the “don’t wake up the screen” option is chosen, if pushing a particular hard button results in the page changing on the remote, the screen will activate to show this.
The final activation option is the pickup sensor, which can be enabled or disabled.
ProntoProEdit NG
The Pronto advertises the unique opportunity of fully customizing its user interface, and if you truly want to take it up on that offer you’ll need to abandon the more limited on-board setup facilities and move over to the real powerhouse, ProntoProEdit NG. With this puppy you can completely – and I do mean completely – adapt the TSU7000 to your needs.
Now, there may be those who want the ProntoPro NG’s features but are neither creatively nor technically inclined. And since many will find the default interface lacking and want to go further, this can create a predicament as far as ProntoProEdit NG is concerned, since it’s not exactly the easiest software to use. There are alternatives, such as having someone else program the remote, but chances are you’ll want to at least try configuring it yourself. In this section I’ll be describing the software features required for creating a file from scratch, so you’ll be able to get a feel for how it all works. Also, remember that there’s an active user community of ProntoPro NG owners here that can help with any questions.
|