|
...Continued from Page 8.
Editing a macro. |
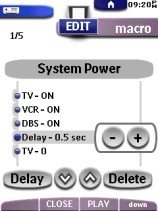
Once in "Edit" mode with a macro button selected, the remote can be navigated as usual - all commands entered are automatically recorded with a loud beep confirmation. When finished, pressing the Macro Menu button returns to a screen that now lists all entered commands.
The neat thing with all Prontos is that macros can be fully edited right on the remote. Selecting a particular step activates two arrow buttons which are used to reposition the command up or down the list. Another button, [DELAY], adds a pause to the macro of between 0.1 and 99.9 seconds, in 0.1 second increments. When a length has been chosen, the arrow buttons move it anywhere in the list. It is also possible to delete any commands that don't belong.

Editing a timer. |
Timers and such...
Another feature inherited by the ProntoPro are timers. Combined with the built-in clock (12/24 hour configurable) that's always shown on-screen, timers allow you to automate system functions - macros - to a set schedule. The ProntoPro doesn't support a full date, just the time and day-of-week, so its usefulness is limited to repetitive items or whatever happens within the next seven days. Occupying their own group under the Macro Menu (when a new group is created the remote asks what type you'd like to create), each timer can reference a single button - either a device function or macro - under both "Start" and "Stop" screens. Since the "Start" and "Stop" functions can be completely unrelated, you effectively get two timers in one.
The remote permits you to set the exact day and time of day to run the timer. Want something to run on Monday, Thursday and Friday? No problem. Another button, "Weekly", means the timer will continue to run after the first week. Otherwise, each configured day will be unselected after the timer has run, making it a one-shot event. Timers don't need to be "activated" on the remote to run. As long as there is enough information, the timer is alive and will operate when configured. When the timer runs, a little bell icon appears at the top of the screen.
System Setup
The ProntoPro's system configuration menu can be accessed by pressing the icon of the remote at the top of the screen for three seconds. The first screen shows the current battery voltage level. When power gets low, the remote will display a warning on all screens and disallow any system changes. However, if the remote does run completely out of power the only setting that will be lost is the clock. Everything else is safe and secure for an unspecified amount of time.
The next option down configures the aforementioned clock. Below that is the LCD timeout setting, which can be from 1 to 240 seconds in length. Beneath that is the hard button backlight timeout settings, also configurable from 1 to 240 seconds. At the bottom of the screen is the LCD backlight brightness setting. The second setup screen displays free system memory and allows the pickup sensor or Mode Menu to be disabled. Also on this page are touchscreen and hard button beep tones, both with three volume levels plus off. As well, there are options to recalibrate the screen if it stops sensing buttons where they should be and to revert the remote back to the factory default configuration. The third and final screen contains only two buttons that allow you to view the opening Pronto animation (why?) and to look at the various firmware version numbers.
|