|
...Continued from Page 10.
Button Editing
Although ProntoProEdit looks and operates almost identically to the first version released, Philips has taken all of the user interface refinements made for ProntoEdit v2.0 and incorporated them here. Most edits in ProntoProEdit are accomplished through two techniques - double-clicking and right-clicking on a button. Double-clicking on a button opens the "Button Properties" screen, which is where you'll be spending much of your time.
Button Properties |
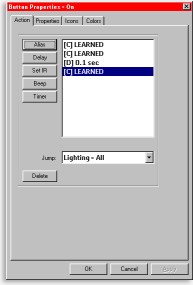
There are four Button Properties tabs. The first, "Action", is where all commands are added for a button. Remember earlier when I said that macros should really be edited in the PC software? Well, in ProntoProEdit you aren't limited to merely putting macros under the Macro Menu. In reality, every button is a macro by default - it's just that some only have one function. System power buttons, favorite channels, CD jukebox listings - anything you like, anywhere. The second tab, "Properties", is where the button's label, font size and physical position are configured. The third, "Icons", is for loading custom bitmaps off of disk, or saving the existing ones to new files. The fourth tab, "Colors", configures the text and background shades for that button.
Lights, camera, action!
To begin, we'll cover the "Action" tab. On the right side of the window is a listing of all commands associated with that button. On the left is a selection of different command types. Below that is a pull-down where the panel to jump to after all tasks are completed is specified. ProntoProEdit features five different types of commands: "Aliases", which form a soft link to another button elsewhere on the remote, "Delay", which adds a pause from 0.1 to 99.9 seconds in length, "Set IR", from which you can assign preprogrammed or learned commands, "Beep", which causes the button to beep in a customizable manner, and finally "Timer", for adding a timer command. Most of these functions have already been described for the base remote and really aren't that much different in ProntoProEdit, but I will touch on two.
Learning IR Codes |
First, the concept of an "Alias" can be a bit hard to get around: basically, you can point button "A" to the commands associated with button "B". Aliases reference the button, not the specific commands, so if button "B" is modified, button "A" will also reflect those changes. In addition, the alias on button "A" uses up only a fraction of the memory that button "B" does. Aliases are almost always used exclusively with macros. When you need to use a specific command in several places, store the command in just one place and add aliases to it - a complete remote navigation screen is provided. Secondly, the new "Beep" function can be used to sound certain tones, or if you have too much time on your hands, play back entire musical tunes.
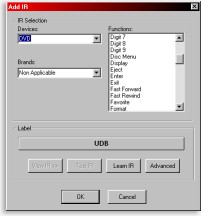
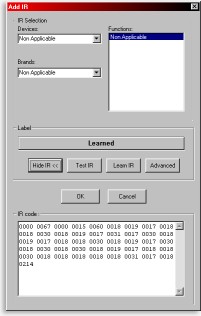
Selecting Preset Codes |
Adding and learning via ProntoEdit.
At the top of the "Set IR" screen is an "IR Selection" area which provides a simple way to select codes from the preprogrammed database. Select a device, a brand, a code set, then a specific function. The UEI database has been completely catalogued for use in ProntoProEdit and even seems more complete than the one included with ProntoEdit 2.0. All functions are described with their true names, such as "Channel Down", "Memo Clear" and "Slow Forward". You don't need to remember that code 23, function 47 is "Power On"; it's all spelled out. Since the database commands stored in ProntoEdit are just pointers to the on-board hardware database, they simply won't do anything on other Pronto or RC5000 remotes. In addition, there's no way to quickly create an entire new device based on one code set - each and every button must be configured individually.
|
|