|
...Continued from Page 10.

ProntoEdit v2.0. |
Nevertheless, it immediately took off due to its incredible power. ProntoEdit's crudeness actually became its biggest benefit. Instead of having set, specific rules and guidelines designed to make programming easier - and consequently less robust - ProntoEdit basically presents users with a blank slate and says "get to work". The result is almost total freedom over design, which power users can work with zealously. True, some of the LCD screen can't be edited. The total customizable portion of the 240x320 resolution is 240x219 pixels, or 68%. Though I'm still hoping Philips will open up the entire region for editing, a lot can be done with what's available.
Screen Layout
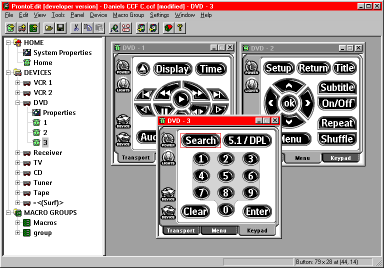
Originally a downloadable and unsupported accessory, the TSU2000 now ships with ProntoEdit 2.0 on CD, along with a full manual and the required serial cable. The main screen features a tree view of the currently open file on the left, with a multi-purpose region for editing on the right. The tree view is split into three segments which correspond to the main sections on the remote - "Home", "Devices" and "Macro Groups". Double-clicking on one of these sections expands it to include all included devices or groups. Each of those items can be expanded further to display individual panels. Listed above the panels for each device is a special "Properties" header where all hard buttons and automatic actions are configured.

The main ProntoEdit screen layout. |
Double-clicking on a specific panel opens up a new window in the right half of the screen with a preview of what the panel will look like. This is also where all work to that panel is done. Chances are you'll want to start off by editing one of the default panels that came with the remote. To upload the configuration from the Pronto, connect the cable to an unused serial port on your computer, then select the "File" menu and "Upload from Pronto" command. Once complete, that file will be loaded into the tree display. For backup purposes, it would probably be wise to save the file to disk.
Button Editing
Most edits in ProntoEdit are accomplished through two techniques - double-clicking and right-clicking. Although ProntoEdit 2.0 looks and operates almost identically to the first version released, Philips has finally started to modify the program into a more intuitive design. The first place this can be seen is on the "Button Properties" screen, which is shown when a button is double-clicked. While the new ProntoEdit shows four tabs, the old version displayed up to 10. The question of whether 10 uncluttered screens or 4 packed ones are better is a matter of user preference, but at least with the new design it's a lot easier to make sense of what does what and where it's located.
The first of the four tabs is "Action", where all commands are added for a button. Remember earlier when I said that any button could be a macro? Well, every button is a macro by default - it's just that some macros only have one function. System power buttons, favorite channels, CD jukebox listings - anything you like, anywhere. The second tab, "Properties", is where the button's label, font size and physical position are configured. The third, "Icons", is for loading custom bitmaps off of disk, or saving the existing ones to new files. The final tab, "Colors", configures the text and background shades for that button.
| 
