|
...Continued from Page 5.
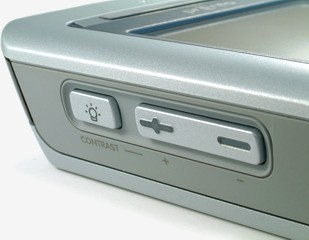
Instead of a rotating contrast wheel, the Pronto NG features digital contrast control – hold down the [Backlight] button and press [Page Up] or [Page Down] to adjust the level at any time. As usual, there is a far greater adjustment range than is practical: 16 steps, even though only two or three of them could ever be considered useful. As it is I find the steps in the useful range too coarse, jumping from “slightly too light” to “slightly too dark” with a single button push. If the 16 steps were consolidated into the middle 30 to 70% of the current range they would be more beneficial.
On or off remote.
Since not everyone is looking for full-blown customization, the TSU3000 provides two programming options: simple and more advanced. If you don’t have a computer (highly unlikely since you’re reading this), there’s the option to complete basic programming right on the remote. Although less sophisticated, this technique does allow for any number of devices, preprogrammed codes, custom button labels and macro recording.
Otherwise, if you’d like to open up a wealth of other possibilities the TSU3000 ships with a USB cable and the ProntoEdit NG (“PENG”) editing package on CD. For this review we’ll cover both options, beginning with the on-remote method. For reference, our sample TSU3000 remote control is using firmware APP version 2.3.9.
The TSU2000's interface on the left, the new TSU3000 on the right. |
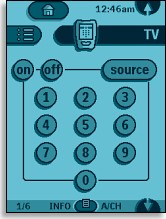
The Pronto’s main user interface has changed substantially from previous editions, the major change being a more compact control bar at the top. Absent on the TSU3000 is the old “Macro Menu” – macros can now be placed anywhere. Just two main sections remain: “Devices” and “Home”... the latter of which isn’t even used in the default configuration! Supplementing these are two automatically generated areas, the “Device Overview” to list all possible devices, and the “Page Overview” to list all pages contained in a device.
On either side of the control bar are two sideways arrows for switching to the previous or subsequent device. Beside the leftmost arrow is a small button, with a picture of the remote on it, used to enter the remote’s setup menu. In the middle of the screen is a larger button that displays the currently active section or device’s name and serves double duty as way to return to the “Device Overview” menu. To the right is a smaller button with the current and maximum page number (such as “1/5”). Clicking on this while in a device will display the “Page Overview”.
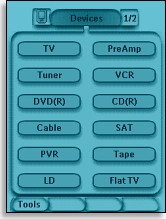 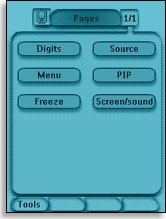
The Device and Page Overview screens. |
Under the control bar is a thin status line for the date, time and remaining battery power. Running along the bottom of the screen are four spots for button labels, corresponding with the four unlabeled hard buttons just below. The leftmost button is already labelled “Tools” on the remote, used for accessing the configuration menu. Although not editable on the remote control, this button can be customized in ProntoEdit NG.
Adding devices the old fashioned way.
Although the Pronto NG TSU3000 ships with a rather basic graphical layout, when your main need is functionality it can be enough. By default the remote features fourteen devices: TV, Tuner, DVD, Cable, PVR, LD, PreAmp, VCR, CD, Satellite, Tape, Flat TV, Web TV and Home Automation. Remember, there’s no specific limit to how many devices the remote can hold – you’re only constrained by memory!
|