|
The first large cluster of in-device buttons is the numeric keypad, complete with [Enter] and an HDTV-specific [Dot] (or "dash") key. Printed on the case above the ten numerals are A/V receiver input names. Next down are a pair of round, extra large and easy-to-use [Volume] and [Channel] toggles copied directly from the RM-VL710, with matching [Muting] and [Recall] keys beneath. Between these are four miscellaneous buttons: [Digital/Analog], [Twin View] (better known outside the Sony circle as "PIP"), [Sleep] and [Info].
The next key cluster is the all-important 5-way menu cursor control, flanked on the outer corners by [Guide], [Menu], [Tools] and [Exit]. This particular layout is much more favorable over the cramped 4-way cursor with separate [OK] button as seen on the RM-V402. Finally, at the very bottom of the remote is a standard 6-key transport control (with safety [Record] key).
Same flavor, less filling.
The four keys new to the RM-V310 are [Dot], [Digital/Analog], [Exit] and [Tools]. Compared to the RM-VL600 the RM-V310's layout is more compact, with 16 rows of buttons compressed into 15 rows' worth of space. Tactile nubs are present on the [5], [Channel Up] and [Play] keys. One oversight in the RM-V310's layout is the lack of DVR-related functions such as dedicated chapter skip and page up/down keys, although many such devices will function without their inclusion.
Despite an improved keypad layout, tactile response has had little attention paid to it. Although this is more of a significant issue on the RM-VL600, where tactile response actually suffered, the RM-V310's keys sport the same limited key travel and generally mushy response as the RM-V402. One area where improvement is seen is with button height - the keys on the RM-V310 are raised significantly above the remote compared to the RM-V402, and can no longer be pressed below the surface of the remote.
Setup - what, you want options?
There are exactly four setup operations that can be performed on the RM-V310. One: enter a code number. Two: reassign a device button to another type of device. Three: change the volume control from "TV/Receiver" to "Receiver". Four: enter channel macros. Since the RM-V310 has no display or LED status indicators, programming is done blindly.
The first option, entering a code, is accomplished by pressing the [Set] and [Power] buttons at the same time. Next, press the device button, enter the first three-digit number matching your brand as found on the code list, followed by the [Enter] key. If the code doesn't work, repeat the process with the next number. If the code list has somehow disappeared or if no appropriate code is printed, the search feature can be used to explore the entire built-in brand database. Instead of entering a three-digit number, alternately pressing the [Channel Up] and [Power] keys to step through the list and test each code's "Power" function. When a functional one has been found, press [Enter] to save.
The second item is changing the type of component that a device button operates. Unlike the RM-VL600 remote control with its 4-digit codes, where the first digit automatically tells the remote which type of device the code is intended for, the RM-V310 uses Sony's older 3-digit system. All device buttons (except for TV) can be configured to operate any other type of device. So the [CBL] button could be reconfigured to operate, for example, a second DVD player. Simply hold the [Set] and [Power] buttons at once, press the device button to change, followed by the [Stop] button, then tap the digit corresponding to the new type of device as indicated in the manual.
|
|


 Enlarge this photo.
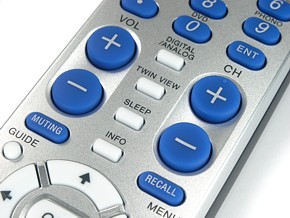 Enlarge this photo.