|
...Continued from Page 3.
 Advanced Editing
The Pronto’s strong macro support allows you to configure a series of commands to transmit each time a device is selected. This option is available under the Properties screen and like regular buttons can have up to 255 steps assigned. You could have the pronto turn the specific component on, set the receiver input, television input, press play and more all in one step. The possibilities of unlimited macros offers endless design concepts to explore. Some users have panels of buttons that adjust their X10 lighting system to particular brightness levels, while other folks have configured a system of "favorite channels" where screens of channel names automatically dial the proper number into their tuner.
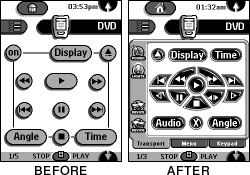
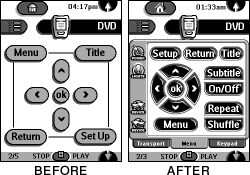 That last idea would be even better if you could use the channel’s logo as the button, right? No problem! ProntoEdit provides complete control over button images via any custom 256-color BMP file. Although the software will adequately convert such images down to four basic gray shades as supported by the Pronto, for better control over dithering I’d recommended you perform this step beforehand in a photo editing suite. Each button can have up to four images attached, but you’ll only need two of them: "pressed" and "unpressed". If you don’t want to create two versions of every button you could assign the same image to both states. ProntoEdit automatically locates duplicate images and stores them only once in the completed CCF file. Other button attributes include background colors (if no image is attached) as well as three font sizes and four font colors.
 Custom Bitmaps
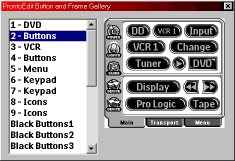
For my configuration I designed every button from scratch as vector art in CorelDRAW, and converted them to four-color bitmaps in Corel PHOTO-PAINT. From there they were imported one at a time into ProntoEdit’s gallery. The gallery is a static window with panels of pre-defined bitmapped buttons that can be opened when editing a configuration for quick access. To edit the default gallery you open it as a CCF file, add screens, edit them to your liking, save the file and apply the changes by restarting ProntoEdit. When editing your main CCF you simply drag-and-drop an image from the gallery to anywhere on a panel. You can further duplicate an existing button by CTRL-dragging, or change only the bitmap of an existing button by ALT-dragging. You can also use Frames, which are static bitmapped images that don’t have any active function. ProntoEdit provides layer controls so buttons can be on top of other buttons or frames, though the only options are "move to front" and "move to back".
 Which brings me to another point. For all its’ power and functionality, ProntoEdit is sorely missing user-friendliness. Experienced computer users will probably pick up on the nuances of editing a screen quickly enough, but those less technically inclined may find ProntoEdit overly complex at first glance. Missing are several niceties such as the ability to select multiple objects at once or line bitmaps up with one another. Custom snap-to grids are available, but after several hours use I found them more troublesome than helpful when panels don’t all follow the exact same layout. Considering the wealth of features and power that are provided, however, it’s easy to overlook these few shortcomings and quirks.
One of the major redeeming strengths is a great time saver called ProntoEmulator. As ProntoEdit isn’t one hundred percent WYSIWYG, Philips intelligently included a fully functional software version of the Pronto that you can run to "test out" your CCFs before uploading. Everything from the real pronto is duplicated including hard buttons and the system information screen - nifty!
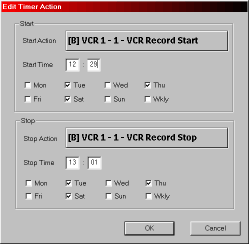 A new addition to the APP v4.81 firmware upgrade is timers and beep functions. With timers, your Pronto effectively becomes a tool for automating your home theater on a fixed schedule. Screens in ProntoEdit or on the physical remote allow you to define a "start" and "stop" function set to run at particular times on a repeating schedule or merely on selected days. As a timer can only contain a single action, it is usually best to pre-define a macro of multiple commands elsewhere on the remote and alias the timer to it. When the timer is set to run the remote will wake up and transmit all assigned IR codes.
The new custom "beep" ability, on the other hand, is a real functional enigma. You need to think really hard to find a place where they would be truly functional. The only useful place that springs to mind would be small tunes to signal the completion of lengthy macros. When defining a tone you set the volume, frequency and duration for each note. Pauses as short as one tenth of a second between notes may be obtained using the delay function, even shorter ones by defining a beep tone set to a volume of "0". Creation of such audio cues is somewhat hampered by the PC emulator’s inability to reproduce any custom tone, meaning you must download the CCF to the Pronto each time to test.
For users who already own a Pronto, ProntoEdit is a fantastic addition that only strengthens the value of their purchase. For folks looking to purchase a touchscreen universal remote, this may just be the clincher that seals the deal.
|